CMK

Let's create something!


  • Home

  • Categories

  • Tags

  • Archives

  • About

MERN Stack: Online Exam System

Posted on 2018-03-01 | In Portfolios | Comments:

I. About

  • A MERN stack online examination application, providing features like
    • JWT authentication
    • random questions generation,
    • timer
    • automatic grading

II. Github

https://github.com/caomingkai/Online-Exam-System.git

  • MongoDB, Mongoose
  • Node.js, Express
  • ReactJS, Redux, React Router
  • JWT, Passport

III. How to run it?

  1. git clone it
  • cd into frontend folder and backend folder, and run npm install respectively
  • run npm start from frontend folder
  • run nodemon app.jsfrom backend folder

IV. Charts

  • Chart1: Login Page

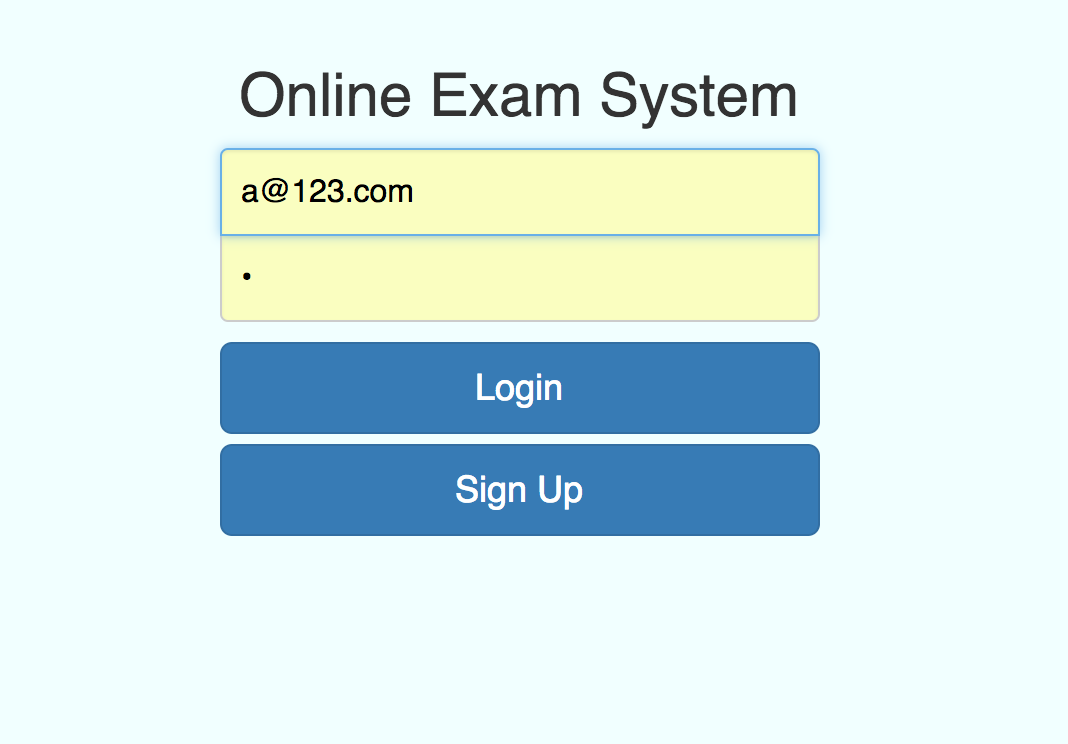
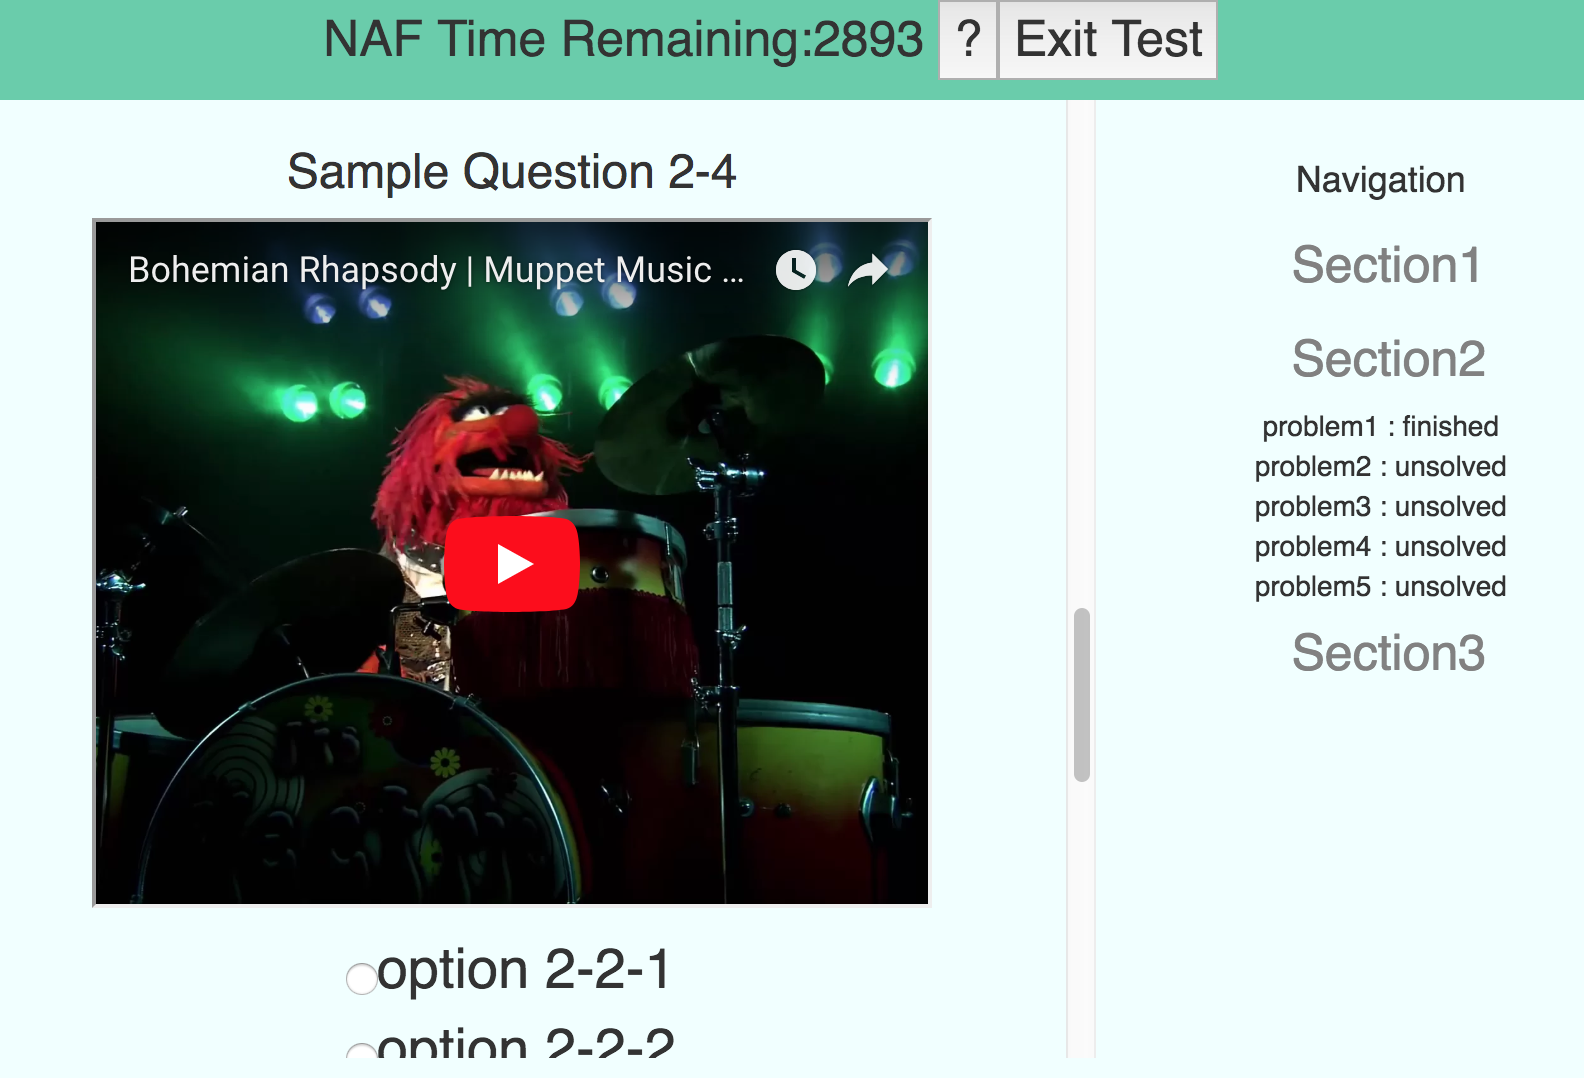
  • Chart2: Main Page ( todo: css )

Web Template Engine

Posted on 2018-02-27 | In Portfolios | Comments:

I. Main idea:

similar to Python string’s format method like “ A is {title} of B”.format(title=”father”); Whereas, template engine is also a formatter, but much more powerful.

An important phase in any web application is generating HTML to be served to the browser.

Very few HTML pages are completely static: they involve at least a small amount of dynamic data, such as the user’s name. Usually, they contain a great deal of dynamic data: product listings, friends’ news updates, and so on.

The mostly-static style used in templates is the opposite of how most programming languages work.

A template language flips this around: the template file is mostly static literal text, with special notation to indicate the executable dynamic parts.

II. tech stacks

Python – Template language Django

Github: https://github.com/caomingkai/500-Lines-Or-Less

III. template syntax

  1. dot :

    1
    <p>The price is: {{product.price}}, with a {{product.discount}}% discount.</p>
  2. filters with pipe character:

    1
    <p>Short name: {{story.subject|slugify|lower}}</p>

  3. logic control:

    1
    2
    3
    4
    5
    6
    <p>Products:</p>
    <ul>
    {% for product in product_list %}
    <li>{{ product.name }}: {{ product.price|format_price }}</li>
    {% endfor %}
    </ul>
  4. comment:

    1
    {# This is the best template ever! #}

III. Two approach to implement the Template Engine

  1. Two main phases: parsing the template, and then rendering the template

  2. For ‘parsing phase’:

  • interpretation (Django )
  • compilation (Jinja2 and Mako | also, we will use)

IV. Compiling to Python

  1. The template engine will compile templates to Python method called “render_function(context, do_dots)”
  2. context dictionary : carry kinds of dynamic variables to be embedded in template
  3. do_dots method: passed-in method name, handling dot access

V. Code_bulider

  1. Being called by template object, to help to read passed-in lines, using ‘add-line()’
  2. Integrate lines into a well-formed python script
  3. return to templage object the final executable script by calling “ exec(python_source, global_namespace)”
1
2
3
4
5
6
7
Code-builder
|__ add_line() : read in ready-to-run python lines
|__ add_section() : set aside space for later variable assignment
|__ indent() : indent to form well-formed python
|__ dedent() : dedent to form well-formed python
|__ get_globles() : 1- call "exec(python_source, global_namespace)"
2- return executable script by calling get_globles()['render_function']

VI. Template

  1. used to handle template, and parse it into executable lines
  2. call functions of Code-builder object, to produce an executable script to output ‘HTML string’
  3. with helper function: do_dots()
1
2
3
4
5
6
7
8
9
10
11
12
13
14
15
16
17
18
Template
|__ __init__(context): 1- read context( ie, values for var in template )
| 2- break down template text by Regex into 4 cases
| 3- call functions of Code_bulider to produce HTML
|
|__ 4 cases: 1- Literal content(pure string)
| 2- {{ ..... }} variables, converted to string
| For case 1 and 2, just concatenate them;
| 3- {# ..... #}
| Just ignore
| 4- {% ..... %} control statements
| 4.1- ops_stack() for nested control statements
| 4.2- filter_handler() for 'var|upper'
| 4.3- indent()/ dedent()
|
|__ self._render_function() = code.get_globles['render_function'];
|
|__ render(): calls self._render_function() with context param

VII. Template Test

  • great introduction of unittest: https://www.jianshu.com/p/38948d0d73f5
  • unittest是Python自带的单元测试框架,我们可以用其来作为我们自动化测试框架的用例组织执行框架
  1. unittest的流程:写好TestCase,然后由TestLoader加载TestCase到TestSuite,然后由TextTestRunner来运行TestSuite,运行的结果保存在TextTestResult中,我们通过命令行或者unittest.main()执行时,main会调用TextTestRunner中的run来执行,或者我们可以直接通过TextTestRunner来执行用例。
  2. 一个class继承unittest.TestCase即是一个TestCase,其中以 test 开头的方法在load时被加载为一个真正的TestCase。
  3. verbosity参数可以控制执行结果的输出,0 是简单报告、1 是一般报告、2 是详细报告。
    可以通过addTest和addTests向suite中添加case或suite,可以用TestLoader的loadTestsFrom__()方法
  4. 用 setUp()、tearDown()、setUpClass()以及 tearDownClass()可以在用例执行前布置环境,以及在用例执行后清理环境
  5. 我们可以通过skip,skipIf,skipUnless装饰器跳过某个case,或者用TestCase.skipTest方法。
    参数中加stream,可以将报告输出到文件:可以用TextTestRunner输出txt报告,以及可以用HTMLTestRunner输出html报告。

Weather Chat

Posted on 2018-01-27 | In Portfolios | Comments:

Introduction

A weather query web application, enabling real-time group chat and scrolling message display

Tech stacks: HTML, Bootstrap, AngularJS, Wilddog NoSQL Database


ES6

Posted on 2018-01-10 | In Full stack | Comments:

I. JavaScript is OOP

JS的始末、与Java的区别:https://juejin.im/entry/5975e76af265da6c2a74bc45

JavaScript 是一种基于原型实现的面向对象的语言, 根本没有类的概念,全是 object !

  1. 通过 “prototype” 以及 “proto“ 来实现:类的继承
    • “prototype” 以及 “proto“ 重要性:https://juejin.im/entry/5975e76af265da6c2a74bc45
  2. “函数/function”是一等公民,ie. is also an object
    • 实际上说的是它们和其他对象object都一样,也有自己的method,也可以被当作参数被传入/传出
  3. 如何创在object对象—直接造!

    1
    2
    3
    4
    5
    6
    7
    8
        
    var animal = {
    name : 'animal',
    eat : function( ){
    console.log( this.name + 'is eating');
    }
    }
    animal.eat( ) // animal is eating"
  4. 题外话: 由于对象并不和类关联, 我们可以随意地给这个对象增加属性!

    1
    2
    animal.color = 'black';   
    // animal 现在多了一个 color 的属性
  5. prototype: 继承

    • 继承:就是让两个对象建立关联!
    • 每个对象都有一个特殊的属性叫做proto, 可以用这个属性去关联另外一个对象(这个对象就是所谓的原型了)
    • 例子:

      1
      2
      3
      4
      5
      6
      7
      8
      9
      10
      11
      12
      "var dog{
      name = 'dog';
      _proto_ = animal;
      }

      var cat{
      name = 'cat';
      _proto_ = animal;
      }

      dog.eat( ); // dog is eating
      cat.eat( ); // cat is eating"
    • 例子分析:

      • 对象dog 的原型是animal (注意:也是一个对象), 对象cat的原型也是animal 。
      • 无论是dog还是cat ,都没有定义eat()方法, 那怎么可以调用呢?
      • 当eat方法被调用的时候,先在自己的方法列表中寻找, 如果找不到,就去找原型中的方法, 如果原型中找不到, 就去原型的原型中去寻找…… 最后找到Object那里, 如果还找不到, 那就是未定义了。
    • 与Java 联系:
      • JVM虚拟机的时候, 也提到了一个对象在执行方法的时候,需要查找方法的定义,这个查找的次序也是先从本对象所属的类开始, 然后父类, 然后父类的父类…… 直到Object, 思路是一模一样的!
      • 只不过Java 的方法定义是在class中, 而这个javascript 的方法就在对象里边, 现在我觉得似乎在对象里更加直观一点啊。

II. OOP的4个特性:

  • 封装(encapsulation):把相关信息,无论数据或方法都存储在一个对象中的能力。
  • 聚合(combination):将一个对象存储在另一个对象中的能力。(LinkedList <--> Node)
  • 继承(inheritance):一个类依赖另一个类 ( 或一些类 )中的一些性质和方法的能力。
  • 多态(polymorphism):写一个函数或方法,他可以以各种不同形式工作的能力。

III. var vs let vs const

  • 使用var声明的变量,其作用域为该语句所在的函数内,且存在变量提升现象;
  • 使用let声明的变量,其作用域为该语句所在的代码块内,不存在变量提升;
  • 使用const声明的是常量,在后面出现的代码中不能再修改该常量的值。但是其作用域为该语句所在的代码块内,因此不同的blcok可以继续定义同一个名字的const

1. var变量的局部作用域是函数级别的:使用区域上至函数头、下至函数尾

  • 不同于 C 语言,在 C 中,作用域是块级别的。 JavaScript 中var变量没有块级作用域。
  • let变量作用域是块级的
  • js 中,函数中声明的变量在整个函数中都有定义。比如如下代码段,变量 i 和 value 虽然是在 for 循环代码块中被定义,但在代码块外仍可以访问 i 和 value。
  • 例子:

    1
    2
    3
    4
    5
    6
    7
    8
    9
    function foo() {
    for (var i = 0; i < 10; i++) {
    var value = "hello world";
    }
    console.log(i); //输出10
    console.log(value);//输出hello world
    }

    foo();

2. For Loop: var vs let

  • var declaring a variable in the head of a for loop creates a single binding (storage space) for that variable:

    1
    2
    3
    4
    5
    const arr = [];
    for (var i=0; i < 3; i++) {
    arr.push(() => i);
    }
    arr.map(x => x()); // [3,3,3]

    Every i in the bodies of the three arrow functions refers to the same binding, which is why they all return the same value.

  • If you let declare a variable, a new binding is created for each loop iteration:

    1
    2
    3
    4
    5
    const arr = [];
    for (let i=0; i < 3; i++) {
    arr.push(() => i);
    }
    arr.map(x => x()); // [0,1,2]

    This time, each i refers to the binding of one specific iteration and preserves the value that was current at that time. Therefore, each arrow function returns a different value.

  • const works like var, but you can’t change the initial value of a const-declared variable:

    1
    2
    3
    4
    5
    // TypeError: Assignment to constant variable
    // (due to i++)
    for (const i=0; i<3; i++) {
    console.log(i);
    }
Getting a fresh binding for each iteration may seem strange at first, but it is very useful whenever you use loops to create functions that refer to loop variables, as explained in a later section.

IV 闭包:closure

  • 使内部函数可以访问定义在外部函数中的变量(常见于函数式编程)
  • 假如我们要实现一系列的函数:add10,add20,它们的定义是 int add10(int n)。
  • 为此我们构造了一个名为 adder 的构造器,如下:

    1
    2
    3
    4
    5
    6
    7
    8
    9
    10
    11
    12
    var adder = function (x) {
    var base = x;
    return function (n) {
    return n + base;
    };
    };

    var add10 = adder(10);
    console.log(add10(5));

    var add20 = adder(20);
    console.log(add20(5));
  • 每次调用 adder 时,adder 都会返回一个函数给我们。我们传给 adder 的值,会保存在一个名为 base 的变量中。由于返回的函数在其中引用了 base 的值,于是 base 的引用计数被 +1。当返回函数不被垃圾回收时,则 base 也会一直存在。

  • 我暂时想不出什么实用的例子来,如果想深入理解这块,可以看看这篇 http://coolshell.cn/articles/6731.html

V. Event

JavaScript 与 HTML 的交互是通过 事件(event) 来处理的

VI. JS创建Object的7种方式

https://xxxgitone.github.io/2017/06/10/JavaScript%E5%88%9B%E5%BB%BA%E5%AF%B9%E8%B1%A1%E7%9A%84%E4%B8%83%E7%A7%8D%E6%96%B9%E5%BC%8F/

  • 方法一:直接使用现有的 Object( )

    1
    2
    3
    4
    var book = new Object(); // Create the object
    book.subject = "Perl"; // Assign properties to the object

    book.author = "Mohtashim";
  • 方法二:声明自己的 constructor

    1
    2
    3
    4
    5
    6
    7
    8
    9
    10
    11
    function Book(title, author){
    this.title = title;
    this.author = author;
    this.addPrice = addPrice; // Assign that method as property.
    }

    function addPrice(amount){
    this.price = amount;
    }

    var book1 = new Book(‘Book Name’, ‘Aride’);

VII. with 关键字

  • 被用来作为用于引用一个对象的属性或方法的一种速记。
  • 对象被指定成 with 关键字的参数,进而成为后面语句块的默认对象。这个对象的下的属性和方法可以不指定对象名而直接使用。

    1
    2
    3
    with (object){
    properties used without the object name and dot
    }
  • 例子:

    1
    2
    3
    4
    5
    6
    7
    8
    9
    10
    11
    function addPrice(amount){
    with(this){
    price = amount;
    }
    }
    function book(title, author){
    this.title = title;
    this.author = author;
    this.price = 0;
    this.addPrice = addPrice; // Assign that method as property.
    }

IX. JavaScript Native 对象(6个)

  • Number Object
  • Boolean Object
  • String Object
  • Array Object
  • Date Object
  • Math Object
  • RegExp Object

X. ( func(){…} )( )

  • Putting () after something that evaluates to a function will call that function. So, hi() calls the function hi. Assuming hi returns a function then hi()() will call that function. Example:

    1
    2
    3
    4
    5
    function hi(){
    return function(){return "hello there";};
    }
    var returnedFunc = hi(); // so returnedFunc equals function(){return "hello there";};
    var msg = hi()(); // so msg now has a value of "hello there"
  • If hi() doesn’t return a function, then hi()() will produce an error, similar to having typed something like “not a function”(); or 1232();.

XI. Array.map( )

creates a new array with the results of calling a function for every array element

1
2
3
var names = ['Alice', 'Emily', 'Kate'];
function functionName( var ){ var = var + '!' ; }
var names.map(functionName);

XII. this and bind()

  1. this 的问题:谁调用的函数,this就指向谁(一定看link)
    link:https://github.com/alsotang/node-lessons/tree/master/lesson11
  1. bind( ): 指明 this 所指的对象

    • JS背景:

      • function也是一个对象object,因此也有自己的method bind(), apply(), call()
      • func( ) 的调用,实际是隐式的对象调用: retrieveX(); 是在全局scope调用,因此相当于window.func( )
    • bind(obj)方法实际创建了一个新函数,将参数obj绑定到原函数之上,使this有了新的实体【 this:灵魂 — obj:实体 】
      “The bind() method creates a new function that, when called, has its this keyword set to the provided value,”

    • 例子

      1
      2
      3
      4
      5
      6
      7
      8
      9
      10
      11
      12
      13
      14
      var module = {
      x: 42,
      getX: function() {
      return this.x;
      }
      }

      var retrieveX = module.getX;
      console.log(retrieveX()); // The function gets invoked at the global scope
      // expected output: undefined

      var boundGetX = retrieveX.bind(module);
      console.log(boundGetX());
      // expected output: 42
    • bind实现函数借用(相当于Java“继承父类的方法”)

      1
      2
      3
      4
      5
      6
      7
      8
      9
      10
      11
      12
      13
      14
      15
      16
      17
      18
      19
      20
      21
      22
      23
      24
      25
      26
      27
      // 1-----user 对象
      var user = {
      data :[
      {name:"T. Woods", age:37},
      {name:"P. Mickelson", age:43}
      ],

      showData: function(event) {
      console.log(this.data[0].name + " " + this.data[0].age);
      }
      ​
      }

      // 2-----cars 对象
      var cars = {
      data:[
      {name:"Honda Accord", age:14},
      {name:"Tesla Model S", age:2}
      ]
      ​
      }
      ​
      // 我们从之前定义的 user 对象借用 showData 方法
      // 这里我们将 user.showData 方法绑定到刚刚新建的 cars 对象上​
      cars.showData = user.showData.bind(cars);
      cars.showData(); // Honda Accord 14​
      ​
    • user、cars是两个object。

    • user有自己的method user.showData
    • user.showData.bind(cars); bind( ) 会将showData这个function生成一个新的函数,函数体中的this编程了cars object,从而实现的函数借用的目的
    • 弊端:如果cars中也有自己showData method,使用bind有可能将自己的method覆盖;好的方式是使用 call/apply

XIII. call() & apply()

  • JS背景:
    1. function也是一个对象object,因此也有自己的method bind(), apply(), call()
    2. fun( ) 的调用,实际是隐式的对象调用: retrieveX(); 是在全局scope调用,因此相当于window.retrieveX( )
  • 类似Java Interface,很多object都可以使用这个function
  • call() 方法调用一个函数, 参数重指定的this的指向值和以及函数对应的传入参数
  • 例子:

    1
    2
    3
    4
    5
    6
    7
    8
    9
    10
    11
    12
    function Product(name, price) {
    this.name = name;
    this.price = price;
    }

    function Food(name, price) {
    Product.call(this, name, price);
    this.category = 'food';
    }

    console.log(new Food('cheese', 5).name);
    // expected output: "cheese"
  • 在下面的例子中,当调用greet方法的时候,该方法的this值会绑定到i对象。

    1
    2
    3
    4
    5
    6
    7
    8
    9
    10
    function greet() {
    var reply = [this.person, 'Is An Awesome', this.role].join(' ');
    console.log(reply);
    }

    var i = {
    person: 'Douglas Crockford', role: 'Javascript Developer'
    };

    greet.call(i); // Douglas Crockford Is An Awesome Javascript Developer

XIV. CommonJS:是一个规范

  • CommonJS 是以在浏览器环境之外构建 JavaScript 生态系统为目标而产生的项目,比如在服务器和桌面环境中。
  • CommonJS 规范是为了解决 JavaScript 的作用域问题而定义的模块形式,可以使每个模块它自身的命名空间中执行。该规范的主要内容是
  • 模块必须通过 module.exports 导出对外的变量或接口,通过 require() 来导入其他模块的输出到当前模块作用域中。
  • 一个直观的例子:

    1
    2
    3
    4
    5
    6
    7
    8
    // moduleA.js
    module.exports = function( value ){
    return value * 2;
    }

    // moduleB.js
    var multiplyBy2 = require('./moduleA');
    var result = multiplyBy2(4);

XV. CommonJS: import vs export

  • http://es6.ruanyifeng.com/#docs/module#export-default-%E5%91%BD%E4%BB%A4
  • 正常情况:二者都要加花括号 { }

    • 模块功能主要由两个命令构成:export和import。export命令用于规定模块的对外接口,import命令用于输入其他模块提供的功能。
    • 一个模块就是一个独立的文件。该文件内部的所有变量,外部无法获取。如果你希望外部能够读取模块内部的某个变量,就必须使用export关键字输出该变量。下面是一个 JS 文件,里面使用export命令输出变量。
    • 例子

      1
      2
      3
      4
      5
      6
      7
      8
      9
      10
      11
      12
      13
      14
      15
      16
      17
      18
      19
      20
      21
      22
      23
      24
      25
      // circle.js
      export function area(radius) {
      return Math.PI * radius * radius;
      }

      export function circumference(radius) {
      return 2 * Math.PI * radius;
      }


      现在,加载这个模块。

      // main.js
      import { area, circumference } from './circle';

      console.log('圆面积:' + area(4));
      console.log('圆周长:' + circumference(14));


      上面写法是逐一指定要加载的方法,整体加载的写法如下。

      import * as circle from './circle';

      console.log('圆面积:' + circle.area(4));
      console.log('圆周长:' + circle.circumference(14));
  • default情况:不需要花括号 { }

    • 使用情景:

      • 从前面的例子可以看出,使用import命令的时候,用户需要知道所要加载的变量名或函数名,否则无法加载。但是,用户肯定希望快速上手,未必愿意阅读文档,去了解模块有哪些属性和方法。
      • 为了给用户提供方便,让他们不用阅读文档就能加载模块,就要用到export default命令,为模块指定默认输出。
      • export default命令用于指定模块的默认输出。显然,一个模块只能有一个默认输出,因此export default命令只能使用一次。所以,import命令后面才不用加大括号,因为只可能唯一对应export default命令。
      • 本质上,export default就是输出一个叫做default的变量或方法,然后系统允许你为它取任意名字。所以,下面的写法是有效的。
      • 例子:

        1
        2
        3
        4
        5
        6
        7
        8
        9
        10
        11
        12
        // modules.js
        function add(x, y) {
        return x * y;
        }
        export {add as default};
        // 等同于
        // export default add;

        // app.js
        import { default as foo } from 'modules';
        // 等同于
        // import foo from 'modules';
  • 比较: 下面比较一下默认输出和正常输出

    1
    2
    3
    4
    5
    6
    7
    8
    9
    10
    11
    12
    13
    // 第一组
    export default function crc32() { // 输出
    // ...
    }

    import crc32 from 'crc32'; // 输入

    // 第二组
    export function crc32() { // 输出
    // ...
    };

    import {crc32} from 'crc32'; // 输入"

XVI. ...:Spread Operator展开运算符

https://blog.fundebug.com/2017/07/19/master_object_spread_operator/

  • 展开运算符将所有可枚举的属性从一个对象展开到另一个对象去。一个例子:

    1
    2
    3
    4
    const obj1 = { c: 3, d: 4 };
    const obj2 = { a: 1, b: 2, ...obj1 };
    console.log(obj2); //{ a: 1, b: 2, c: 3, d: 4 }
    //obj1的所有属性被展开到obj2中去。
  • 应用场景1:deep copy

    1
    2
    3
    4
    5
    6
    const obj = { a: 123, b: 456 };
    const objCopy = { ...obj };
    console.log(objCopy);

    // { a: 123, b: 456 }
    // 注意: 不会递归地深度拷贝所有属性
  • 应用场景2:合并多个对象

    1
    2
    3
    4
    5
    6
    const obj1 = { a: 111, b: 222 };
    const obj2 = { c: 333, d: 444 };
    const merged = { ...obj1, ...obj2 };
    console.log(merged);

    // { a: 111, b: 222, c: 333, d: 444 }

Template literals: ` `

  • 处理字符串中变量:使用 { }包含起来
  • use the ` around a series of characters, which are interpreted as a string literal;
  • But any expressions of the form ${..} are parsed and evaluated inline immediately.

  • 为什么用它?—简洁

    1
    2
    3
    4
    5
    6
    7
    8
    9
    10
    11
    12
    13
    14
    15
    16
    var a = 5;
    var b = 10;
    console.log('Fifteen is ' + (a + b) + ' and \n not ' + (2 * a + b) + '.');
    // "Fifteen is 15 and
    // not 20."

    ----------------------------------
    控制打印更简单,不用\n,直接断行。如下:
    ----------------------------------

    var a = 5;
    var b = 10;
    console.log(`Fifteen is ${a + b} and
    not ${2 * a + b}.`);
    // "Fifteen is 15 and
    // not 20.""

XVII. Special Variables $, $$, _

  • Using $
    • For instance, the $ variable has been made popular by several JavaScript libraries, most notably jQuery. You can use it to alias operations that are commonly performed, such as the following (1):
    • var $ = document.getElementById;
    • var myElement = $(‘targetElement’);
    • If you declare this variable outside of a function it will be a global variable and will compete with libraries that use the same global variable, so it’s probably best not to use it.
    • Interestingly, originally the dollar sign $ was originally intended for ‘mechanically generated code’ (2), but as the usage of the symbol has become popular for other purposes, it looks like the latest version of JavaScript (ECMAScript 5th edition) now officially ‘oks’ its use:
    • This standard specifies specific character additions: The dollar sign ($) and the underscore (_) are permitted anywhere in an IdentifierName.
  • Using $$
    • Some have come up with the solution of simply using two or more $$ symbols in order to distinguish the variable from libraries that just use a single $:
    • var $$ = document.getElementById;
    • var myElement = $$(‘targetElement’);
  • Using _
    • You will find that you can use the underscore _ in the same way to alias variables and functions:
    • var _ = document.getElementById;
    • var myElement = _(‘targetElement’);
  • Other symbols
    • If you’re really getting adventurous, you can even try using other symbols such as square root √, which seems to work just fine, just as $ and _ above. The

XVIII. Array: map(), filter(), reduce()

Array的几个常用方法: 包含filter(),map(),sort(),reduce(),可在 Console 面板中查看结果。

map(), filter(), reduce() 不会修改原来Array;而是生成新的Array或者Object

1
2
3
4
5
6
7
8
9
第一组:inventors数组,包含名、姓、出生日期以及死亡日期
const inventors = [
{ first: 'Albert', last: 'Einstein', year: 1879, passed: 1955 },
......
{ first: 'Hanna', last: 'Hammarström', year: 1829, passed: 1909 }
];

第二组:people数组,包含一组人名,名姓之间用逗号分隔。
const people = ['Beck, Glenn', ...... , 'Blake, William'];
  1. filter()过滤操作,筛选符合条件的所有元素,若为true则返回组成新数组:

    1
    2
    3
    4
    5
    6
    7
    8
    9
    10
    eg: 筛选出生于16世纪的发明家

    function bornyear(inventor) {
    return inventor.year >= 1500 && inventor.year < 1600;
    }
    var fifteen = inventors.filter(bornyear);
    console.table(fifteen);

    // 可简化为
    const fifteen = inventors.filter(inventor => (inventor.year >= 1500 && inventor.year < 1600));
  2. map()映射操作,对原数组每个元素进行处理,并回传新的数组;

    1
    2
    3
    4
    eg: 以数组形式,列出其名与姓: 

    const fullnames = inventors.map(inventor => `${inventor.first} ${inventor.last}`);
    console.table(fullnames);
  3. sort()排序操作,默认排序顺序是根据字符串Unicode码点,如10在2之前,而数字又在大写字母之前, 大写字母在小写字母之前。也可使用比较函数,数组会按照调用该函数的返回值排序

    1
    2
    3
    4
    5

    eg: 根据其出生日期,并从大到小排序;

    const birthdate = inventors.sort((inventora, inventorb) => (inventorb.year - inventora.year));
    console.table(birthdate)
  4. reduce()归并操作,总共两个参数,

    • 第一个是函数,可以理解为累加器,遍历数组累加回传的返回值
    • 第二个是初始数值。如果没有提供初始值,则将使用数组中的第一个元素。

      1
      2
      3
      4
      5
      6
      7
      eg: 计算所有的发明家加起来一共活了几岁;

      const totalyears = inventors.reduce(
      (total, inventor) => { return total + (inventor.passed -inventor.year); }
      , 0);

      console.log(totalyears);

XIX. NO variables inside class

https://stackoverflow.com/questions/41989783/use-of-const-in-react-classes-and-meteor

In ES6 it is not possible to define variables inside the class. Only methods would be possible.

Technically when you write const, var, let inside a class you are defining a variable name, even though I know you tried to create the function.

1
2
3
4
5
6
7
8
9
10
11
12
13
14
15
16
17
18
19
20
21
22
23
24
25
26
27
28
29
30
class Test extends React.Component {

// No.1-1: Wrong
const Test = () => {
return (<img src=".." />);
}

// No.1-2: Correct
Test = () => {
return (<img src=".." />);
}

// No.2-1: Wrong
userExitExam: function(){
const { dispatch } = this.props;
dispatch(exitExam());
}

// No.2-2: Correct
userExitExam(){
const { dispatch } = this.props;
dispatch(exitExam());
}.bind(this)


render(){
return(<img src=".." />)
}

}
  • eg 1-1: Begining with const, Test is a variable, pointing to a function: not allowed in ES6 class;
  • eg 1-2: Test now is a function declaration; also with => function, it implicitly .bind(this)
  • eg 2-1: Rediculous! It intentionally means ‘key:val’ pairs inside an object; However, there is no obj
  • eg 2-2: regular function declaration; But need to .bind(this) explicitly

XX. variable Hoisting(变量提升)

  • 使用var声明的变量,无论声明在何处,都会被提至其所在作用域的顶部)

  • 而且只是“声明提升declaration hoisting”, 不是“值提升 assignment hoisting”

XXI. Import的变量是read-only

That is how ES6 modules work - imports are constant. Only the module that exports them can change them, which then propagates to all modules that import them.

如果需要改变的话,设置setter& getter

1
2
3
4
5
6
7
8
9
10
11
// a.ts
export let value = 1;
export function setValue(newValue: number) {
value = newValue;
}

// b.ts
import * as a from "./a";
function load() {
a.setValue(2);
}

React Learning

Posted on 2017-12-23 | In Full stack | Comments:

0. 组件数据流: Model -> View

  • 父组件M -> 子组件V

    • 父组件prop 之间传给 子组件 prop
  • 子组件M -> 父组件V

    • 回调函数
      • 父组件向子组件传递回调函数
      • JS中,function是一等公民,因此传入的值会作为自身field保存起来;与C/Java不同。
  • sibling 组件间传值 M->V
    • 必须依靠二者共同父组件来传递
      • 但等组件之间的关系越来越复杂时候,这种依靠父组件作为中间人传值方式 would be a mess!
      • Redux comes into picture

1. 双向绑定: Model <-> View

  • 通过绑定<input>的 onChange() 监视 View的变换
  • 在 onChange Handler中更新组件的值,完成 View => Model 的数据流。

2. React 生命周期

  • Mount
    • constructor()
    • componentWillMount()
    • render()
    • componentDidMount()
  • Update
    • componentWillReceiveProps(): 将接收新的props
    • shouldComponentUpdate(): 是否应该被更新?
    • componentWillUpdate(): 组件即将更新
    • render(): 组件被渲染
    • componentDidUpdate(): 组件完成更新
  • Unmount
    • componentWillUnmount(): 组件被卸载前做一些数据清楚哦给你做

3. Depedency

  • In <head>, we needs three <script> in order to use React, that is, “react.js”,”react-dom.js”,”browser.min.js”
  • In <body> where we manipulate JSX, we use a special <script type="text/babel" >, whose typel is “text/babel”

  • In order to make faster rendering at client-side, use “ $ babel src –out-dir build “, parsing all JSX file at directory ‘src’ into javascript files at directory ‘build’, where browser could recognize.

4. ReactDOM.render();

  • what? :It is a basic method used everywhere
  • converting JSX into HTML;
  • inserting HTML at specified DOM point

5. JSX

  • what?
    JavaScript XML

  • “logic” + “view”

    • not spring (no quotes “” )
    • not HTML ( more of XML )
    • support “tag + expression”
  • How to parse?

    • for tags (begin with “<”), parse as HTML
    • for code block(begin with “{“), parse as JavaScript

6. JSX can contain tag array

JSX can unfold all tag in a array

7. Component

  • what? A component is function,
  • accepting “input”(props),
  • returnnig “view”(HTML tag)

  • How to create a component?

    1. functional component

      1
      2
      3
      4
      5
      6
      7
      8
      9
      // 因为不是class概念,只是方程式,因此直接使用props,不使用this前缀
      function Welcome(props) {
      return <h1>Hello, {props.name}</h1>;
      }
      const element = <Welcome name="Sara" />;
      ReactDOM.render(
      element,
      document.getElementById('root')
      );
    2. class component

      1
      2
      3
      4
      5
      6
      7
      // 注意:必须加前缀:this;这样才能取到绑定在Welcome上的props
      class Welcome extends Component {
      render() {
      return <h1>Hello, {this.props.name}</h1>;
      }
      }
      const element = <Welcome name="Sara" />;
  • Notice

    • If a group of tags don’t need its own props or states, just declare it as const, rather than component. [ see demo14 & demo14-2]
    • Component should have no more than one top tag

8. this.props.children

  • what?

    All the properties of a Component belongs to its correspoinding HTML element, except “props.children”, which represent components’ children

  • possible types for children

    • undefined, if no child at all;
    • object, if only have one child;
    • array, if have multiple children;
  • How to traverse properly without error?

    use React.Children to ensure validity

9. Composing Components

  • What?

    • A button, a form, a dialog, a screen: in React apps, all those are commonly expressed as components.
    • On the other hand, we typically have an ‘App’ component at the top level
    • Best Practice: start from bottom-up, work along to the top level
  • How?

    Reuse components just like “li” in “ul”

10. Extracting Components

  • What?
    Split components into smaller components, to achieve more flexibility and reusability.
  • How?
    • Split by functionality
    • One component can contain multiple sub-components

11. State (like ‘props’)

  • Purpose?
    • A non-static component, has its own “state”
  • What?
    • Actually it’s like pros, but “state” is private to component class, compared to “props”
  • How?
    • Use “state” in render(), when state changed, React will can render again.
    • Must use a Class Component, rather than function component.
  • Diff
    • this.props(public:passed-in) 表示那些一旦定义,就不再改变的特性
    • this.state(private:built-in)是会随着用户互动而产生变化的特性。
    • both are belongs to this.
  • Constructor of component class
    • First, always call super(props):
    • Second, set this.state=…;

12. Adding Lifecycle Methods to a Class

  • purpose: In order to save CPU and memory
  • what involved?

    1
    2
    3
    componentDidMount()
    componentWillUnmount()
    setState()
  • About setState()?

    Do Not Modify State Directly=>instead using setState()
    State Updates May Be Asynchronous=> instead,again using setState() with its another form: use a function accepting ‘provState’ as it passed-in parameter to set the state

  • How?: work flow

    1. When is passed to ReactDOM.render(), React calls the constructor of the Clock component. Since Clock needs to display the current time, it initializes this.state with an object including the current time. We will later update this state.
    2. React then calls the Clock component’s render() method. This is how React learns what should be displayed on the screen. React then updates the DOM to match the Clock’s render output.
    3. When the Clock output is inserted in the DOM, React calls the componentDidMount() lifecycle hook. Inside it, the Clock component asks the browser to set up a timer to call the component’s tick() method once a second.
    4. Every second the browser calls the tick() method. Inside it, the Clock component schedules a UI update by calling setState() with an object containing the current time. Thanks to the setState() call, React knows the state has changed, and calls the render() method again to learn what should be on the screen. This time, this.state.date in the render() method will be different, and so the render output will include the updated time. React updates the DOM accordingly.
    5. If the Clock component is ever removed from the DOM, React calls the componentWillUnmount() lifecycle hook so the timer is stopped.
  • state: parent & children ?

    1. state is isolated among components
    2. Parent and Child shall not know if the other is stateful of stateless.
    3. But there is a way for parent to pass down its own state to its children, by using ‘props’

13. Events

  • What?
    Substitute addEventListener(): to add listeners to a DOM element after it is created.

  • Diff ( virtual DOM vs. real DOM)

    • React events are named using camelCase, rather than lowercase.
    • With JSX you pass a function as the event handler, rather than a string. 统一采用expression表达方法,写在’{}’中
      • button onClick={activateLasers}
      • button onclick=”activateLasers()”
    • Cannot return false to prevent default behavior in React. You must call preventDefault explicitly

      1
      2
      3
      4
      5
      6
      7
      8
      9
      10
      11
      12
      13

      function ActionLink() {
      function handleClick(e) {
      e.preventDefault();
      console.log('The link was clicked.');
      }

      return (
      <a href="#" onClick={handleClick}>
      Click me
      </a>
      );
      }
    • be carefull with ‘e’ & ‘this’

14. Conditional Rendering

  • what?

    display optionally between several components, based on a state variable

  • How?

    Have two button components as child_component of a parent component, toggling state of parent component, then resulting in another display component shows up or hide away. [see demo14]

15. List and keys

  • What?

    • Array can produce a list of ‘li’, by using map() function.
    • ‘Keys’ help React identify which items have changed, are added, or are removed. Keys should be given to the elements inside the array, in order to give the elements a stable identity
  • Where to put ‘keys’?

    A good rule of thumb is that elements inside the map() call need keys.

16. Forms -> controlled component

  • What ?

    • Let React “state” be the “single source of truth”。
      用React的state来保存form的用户输入
    • With a controlled component, every state mutation will have an associated handler function. This makes it straightforward to modify or validate user input.

      1
      2
      3
      handleChange(event) {
      this.setState({value: event.target.value.toUpperCase()});
      }
  • Which ?

    1. input element <---> state & state_handler

      1
      <input type="text" value={this.state.value} onChange={this.handleChange} />
    2. textarea <---> state & state_handler

      1
      <textarea value={this.state.value} onChange={this.handleChange} />
    3. select <---> state & state_handler[similar to above ones: has its own “value” props]

      1
      2
      <select value={this.state.value} onChange={this.handleChange}>
      // notice: 'value' in <select> is not 'value' in <option>
  • Handling Multiple Inputs

    add a name attribute to each element and let the handler function choose what to do based on the value of event.target.name.

17. Lifting State Up ( share state among components in their parent component )

Sharing state is accomplished by moving it up to the closest common ancestor of the components that need it. This is called “lifting state up”.

  • How

    1. parent component maintains several state variables
    2. child componnets receive parent’s state && functions as their own props ( function can be passed to children component )
    3. when children get updated, it will call parent’s function, and modify parent’s state, thus leading to re-rendering all its children components
  • Work flow
    Let’s recap what happens when you edit an input:

    1. React calls the function specified as onChange on the DOM . In our case, this is the handleChange method in TemperatureInput component

    2. The handleChange method in the TemperatureInput component calls this.props.onTemperatureChange() with the new desired value. Its props, including onTemperatureChange, were provided by its parent component, the Calculator

    3. When it previously rendered, the Calculator has specified that onTemperatureChange of the Celsius TemperatureInput is the Calculator’s handleCelsiusChange method, and onTemperatureChange of the Fahrenheit TemperatureInput is the Calculator’s handleFahrenheitChange method. So either of these two Calculator methods gets called depending on which input we edited

    4. Inside these methods, the Calculator component asks React to re-render itself by calling this.setState() with the new input value and the current scale of the input we just edited.

    5. React calls the Calculator component’s render method to learn what the UI should look like. The values of both inputs are recomputed based on the current temperature and the active scale. The temperature conversion is performed here

    6. React calls the render methods of the individual TemperatureInput components with their new props specified by the Calculator. It learns what their UI should look like

    7. React DOM updates the DOM to match the desired input values. The input we just edited receives its current value, and the other input is updated to the temperature after conversion.

18. Composition vs Inheritance

  • What?

    React prefer composition model, instead of inheritance, to reuse code between components.

  • How?

    Pass components to props just like data.

  • Inheritance via “Composition”?

    For example, we might say that a WelcomeDialog is a special case of Dialog.
    This can be achieved by composition, where a more “specific” component renders a more “generic” one and configures it with props:

    1
    2
    3
    4
    5
    6
    7
    8
    9
    10
    11
    12
    13
    14
    15
    16
    17
    18
    19
    20
    function Dialog(props) {
    return (
    <FancyBorder color="blue">
    <h1 className="Dialog-title">
    {props.title}
    </h1>
    <p className="Dialog-message">
    {props.message}
    </p>
    </FancyBorder>
    );
    }
    function WelcomeDialog() {
    return (
    <Dialog
    title="Welcome"
    message="Thank you for visiting our spacecraft!" />

    );
    }

19. Summary

Steps to build a React App

  • Step 1: Break The UI Into A Component Hierarchy

    1
    2
    3
    4
    5
    - FilterableProductTable
    - SearchBar
    - ProductTable
    + ProductCategoryRow
    + ProductRow
  • Step 2: Build A Static Version in React (more typing, less thinking)

    • build components that reuse other components and pass data using props.
    • don’t use state at all to build this static version
  • Step 3: Identify The Minimal (but complete) Representation Of UI State

    • To make your UI interactive, you need to be able to trigger changes to your underlying data model. React makes this easy with state.
    • Determine if a data is state by asking three questions:
      • Is it passed in from a parent via props? If so, it probably isn’t state.
      • Does it remain unchanged over time? If so, it probably isn’t state.
      • Can you compute it based on any other state or props in your component? If so, it isn’t state.
  • Step 4: Identify Where Your State Should Live(more thinking, less typing)

    • Identify every component that renders something based on that state.
    • Find a common owner component (a single component above all the components that need the state in the hierarchy).
    • Either the common owner or another component higher up in the hierarchy should own the state.
    • If you can’t find a component where it makes sense to own the state, create a new component simply for holding the state and add it somewhere in the hierarchy above the common owner component.As for the example:
      • ProductTable needs to filter the product list based on state and + SearchBar needs to display the search text and checked state.
      • The common owner component is FilterableProductTable.
      • It conceptually makes sense for the filter text and checked value to live in FilterableProductTable
  • Step 5: Add Inverse Data Flow

    • What?
      • 逻辑流:从上到下( child components depends on state of parent component )
      • 数据流:从下到上( state of parent component, get value from child component )
    • Example
      • support data flowing the other way: the form components deep in the hierarchy need to update the state in FilterableProductTable.
1…89
Mingkai Cao

Mingkai Cao

All-trade Jack, loves full-stack

85 posts
5 categories
136 tags
GitHub E-Mail
© 2020 Mingkai Cao
Powered by Hexo
|
Theme — NexT.Mist v6.0.6