CMK

Let's create something!


  • Home

  • Categories

  • Tags

  • Archives

  • About

FS - Vnode: Special_Read_Write for byte device

Posted on 2018-04-01 | In Courses | Comments:

0. Why need special_read/write ?

  1. 这里的 special_read 是对 vnode 的统一抽象接口而言
    eg: read() / write() / mkdir() / link() / …
  2. vnode 的类型(vn_mode)如下:
    • S_IFDIR directory
    • S_IFREG regular
    • S_IFLNK symlink
    • S_IFCHR character special
    • S_IFBLK block special
  3. File System 使用 vnode 来抽象除了内存(memory)之外所有的设备,包括:硬盘、屏幕、键盘
    • 因此在 File System 的世界,所有外设都由 vnode 统一映射
    • 区别在于: vnode 的成员变量 vn_mode 指定外设类型
    • 特殊的外设,vn_devid/vn_cdev/vn_bdev 记录了相关信息
  4. 尽管不同的文件系统对不同类型的 vnode 统一管理,如:file vnode/directory vnode/char vnode/ block vnode;但是后两个特殊的 vnode 类型(char/block) 却不受文件系统的影响
  5. 因为char/block 两类实际上相当于 IO 设备vnode节点,独立于文件系统;只不过为了接口统一,操作系统将 IO 设备的操作集成到 FS 文件系统中了。
  6. 因此,对于char/block特设vnode 的抽象接口,应该交由相应的 IO设备去实现,而不应该在下放给 specific FS 去实现。这也是为什么在 vnode.c 这里要实现 special_read() | special_write()的原因

1. special file read

1
2
3
4
5
int special_file_read(vnode_t *file, off_t offset, 
void *buf, size_t count)

输入:file-要读取的vnode、offset-偏移量、count-读多少字节数、buf-从文件读取的内容放到buf中
输出:special file 的 read() 返回值
  • 读取vnode的vn_mode,判断 file vnode 的类型
    1. if S_ISBLK(file->vn_mode),return -ENOTSUP;
    2. if S_ISCHR(file->vn_mode),检查是否含有相关函数
  • 交由 special file (char device) 去实现读操作
    1. file->vn_cdev->cd_ops->read(file->vn_cdev, offset, buf, count);

2. special file write

1
2
3
4
5
int special_file_write(vnode_t *file, off_t offset,     
const void *buf, size_t count)

输入:file-要写入的vnode、offset-偏移量、count-写多少字节数、buf-从buf中读内容写到file中
输出:special file 的 write() 返回值
  • 读取vnode的vn_mode,判断 file vnode 的类型
    1. if S_ISBLK(file->vn_mode),return -ENOTSUP;
    2. if S_ISCHR(file->vn_mode),检查是否含有相关函数
  • 交由 special file (char device) 去实现写操作
    1. file->vn_cdev->cd_ops->write(file->vn_cdev, offset, buf, count);

FS - RAM File System

Posted on 2018-04-01 | In Courses | Comments:

0. What?

A specific file system, using RAM
提供 file system “统一接口”的”具体实现”,即:Vnode ops函数指针的具体实现

1. filesystem structure

  • 成员变量:相当于 superblock

    1
    2
    3
    4
    struct ramfs {
    ramfs_inode_t *rfs_inodes[RAMFS_MAX_FILES]; /*
    Array of all files */
    } ramfs_t;
  • 成员函数

    1
    2
    3
    4
    5
    6
    static fs_ops_t ramfs_ops = {
    .read_vnode = ramfs_read_vnode,
    .delete_vnode = ramfs_delete_vnode,
    .query_vnode = ramfs_query_vnode,
    .umount = ramfs_umount
    };

2. ‘inode’ structure

成员变量:相当于 inode

1
2
3
4
5
6
7
typedef struct ramfs_inode {
off_t rf_size; /* Total file size */
ino_t rf_ino; /* Inode number */
char *rf_mem; /* Memory for this file (1 page) */
int rf_mode; /* Type of file */
int rf_linkcount; /* Number of links to this file */
} ramfs_inode_t;

成员函数:

1
2
3
4
5
6
7
8
9
10
11
12
13
14
15
16
17
18
19
20
21
22
23
24
25
26
27
28
29
30
31
32
33
34
static vnode_ops_t ramfs_dir_vops = {
.read = NULL,
.write = NULL,
.mmap = NULL,
.create = ramfs_create,
.mknod = ramfs_mknod,
.lookup = ramfs_lookup,
.link = ramfs_link,
.unlink = ramfs_unlink,
.mkdir = ramfs_mkdir,
.rmdir = ramfs_rmdir,
.readdir = ramfs_readdir,
.stat = ramfs_stat,
.fillpage = NULL,
.dirtypage = NULL,
.cleanpage = NULL
};

static vnode_ops_t ramfs_file_vops = {
.read = ramfs_read,
.write = ramfs_write,
.mmap = NULL,
.create = NULL,
.mknod = NULL,
.lookup = NULL,
.link = NULL,
.unlink = NULL,
.mkdir = NULL,
.rmdir = NULL,
.stat = ramfs_stat,
.fillpage = NULL,
.dirtypage = NULL,
.cleanpage = NULL
};

3. Specific Filesystem operation

1
2
3
4
5
6
7
8
9
10
11
12
13
1. void ramfs_read_vnode(vnode_t *vn)

- 这一步让 generic vnode 有了生命,具备file system specific operations
- 根据传入的vnode中的vnum、fs参数;
- 由该specific file system 对该vnode加载上其自身的 inode信息、vnode_operations等等;
- 使该 vnode 成为完整的对象


2. void ramfs_delete_vnode(vnode_t *vn);
- 从硬盘删除该inode

3. int ramfs_query_vnode(vnode_t *vn);
- 查看该vnode是否在硬盘中有相应的inode

4. vnode operation

  1. entry = VNODE_TO_DIRENT(vndoe dir);
    拿到该 vnode dir 所属的entry,即 [name:inode_num] pairs
    需要使用循环,来遍历所有的entry;无法random access

  2. ramfs_create(vnode_t *dir, const char *name, size_t name_len, vnode_t **result)

    1
    2
    3
    4
    5
    6
    - 调用ramfs_lookup(),确定该dir中没有‘name’名字的 subdir;  
    - 在当前vnode dir中找第一个可用的subdir entry; 一个dir含有的entry不能超过 RAMFS_MAX_DIRENT
    - 调用 inode_num=ramfs_alloc_inode() 创建新的inode
    - 调用 vget(inode_num)
    - vget中会调用ramfs_read_vnode(vnode_t *vn)该vnode的加载完成
    - 设置subdir的名字,完成dir creation
  1. ramfs_mknod(struct vnode *dir, const char *name, size_t name_len, int mode, devid_t devid)

    1
    2
    3
    4
    5
    - 调用ramfs_lookup(),确定该dir中没有‘name’名字的 subdir;  
    - 在当前vnode dir中找可用的subdir entry; 一个dir含有的entry不能超过 RAMFS_MAX_DIRENT
    - 调用 inode_num=ramfs_alloc_inode() 创建新的inode
    - 不需要调用 vget(inode_num),不需要加载vnode,因为其为特殊的special file【character、bulk】
    - 设置subdir的名字,完成dir mknod
  1. ramfs_lookup(vnode_t *dir, const char *name, size_t namelen, vnode_t **result)

    1
    2
    3
    4
    5
    6
    7
    8
    9
    10
    11
    12
    - 注意:这个函数很重要:是 name resolution 的重要一步;负责从 “name ==> vnode_num ==> vnode” 的解析。
    - 也是在这一步,这也是vget()的主要应用场景
    - vget(),又会调用 AFS的ramfs_read_vnode(),从而使返回vnode“活起来”,是vnode完整。
    - 至此,ramfs_lookup() 完成了 VFS-AFS-VFS 的旅程
    - 查看该‘dir'vnode下是否有名字为’name‘的vnode,结果放到result
    - 调用VNODE_TO_RAMFSINODE,根据dir vnode或得 inode
    - 遍历该 inode 下属的entries,看是否有该“name”的 entry
    - if YES,调用vget(entry.ino_num)返回该vnode到result
    - vget中会调用ramfs_read_vnode(vnode_t *vn)该vnode的加载完成
    - vget( ) 内部创建一个“半成品”vnode,传入 ramfs_read_vnode( )
    - ramfs_read_vnode( ) 根据具体的file system将该vnode中的所有成员函数、成员变量补充完成
    - 至此,vget() 返回的vnode是“活的”、完整的
  1. ramfs_link(vnode_t *oldvnode, vnode_t *dir, const char *name, size_t name_len)

    1
    2
    3
    4
    5
    6
    7
    8
    9
    10
    - sets up a hard link. it links oldvnode into dir with the specified name.  
    - 调用ramfs_lookup()保证“name”不在“dir”中
    - 遍历当前vnode dir,找第一个可用的subdir entry; 一个dir含有的entry不能超过 RAMFS_MAX_DIRENT
    - 将新拿到的entry的inode_num,设置为oldvnode的vnode_num
    entry->rd_ino = oldvnode->vn_vno;
    - 设置名字
    strncpy(entry->rd_name, name, MIN(name_len, NAME_LEN - 1));
    entry->rd_name[MIN(name_len, NAME_LEN - 1)] = '\0';
    - 增加 linkcount
    VNODE_TO_RAMFSINODE(oldvnode)->rf_linkcount++;
  2. ramfs_unlink(vnode_t *dir, const char *name, size_t namelen)

    1
    2
    3
    4
    5
    6
    7
    8
    9
    10
    - removes the link to the vnode in dir specified by name  
    - 调用ramfs_lookup()保证“name”在“dir”中
    - 遍历当前vnode dir,找到该entry,并将其名字设置为空
    entry->rd_name[0] = '\0';
    - 减少 linkcount
    VNODE_TO_RAMFSINODE(oldvnode)->rf_linkcount++;

    - 调用vput(vn);处理相应的vnode
    - 减少 vn_refcount
    - 当 vn_refcount==0 时候,调用 ramfs_delete_vnode()
  1. ramfs_mkdir(vnode_t *dir, const char *name, size_t name_len)

    1
    2
    3
    4
    5
    6
    7
    8
    9
    10
    - mkdir creates a directory called name in dir
    - 调用ramfs_lookup(),确定该dir中没有‘name’名字的 subdir;
    - 在当前vnode dir中找第一个可用的subdir entry; 一个dir含有的entry不能超过 RAMFS_MAX_DIRENT
    - 调用 inode_num=ramfs_alloc_inode() 创建新的inode
    - Set entry in its parent: dir
    - 关联inode,entry->rd_ino = inode_num;
    - 设置名字,strncpy(entry->rd_name, name, MIN(name_len, NAME_LEN - 1));
    entry->rd_name[MIN(name_len, NAME_LEN - 1)] = '\0';
    - Set up '.' and '..' in the directory
    - 设置subdir的名字,完成dir mknod
  2. ramfs_rmdir(vnode_t *dir, const char *name, size_t name_len)

    1
    2
    3
    4
    5
    6
    7
    - removes the directory called name from dir. the directory to be removed must be empty (except for . and .. of course).
    - 调用ramfs_lookup(),确定该dir中没有‘name’名字的 entry,并获得 inode;
    - 调用S_ISDIR(),确保该name是一个directory
    - 遍历该inode下的entry,make sure that this directory is empty
    - 便利parent dir,找到对应的name,将其删除
    - 删除名字
    - vput(vn)
  3. ramfs_read(vnode_t *file, off_t offset, void *buf, size_t count)

    1
    2
    3
    4
    5
    - read transfers at most count bytes from file into buf. It begins reading from the file at offset bytes into the file.
    - 调用VNODE_TO_RAMFSINODE(),获得vnode对应的inode
    - 确保inode不是directory
    - 将inode中的内容inode->rf_mem复制到buf中
    memcpy(buf, inode->rf_mem + offset, ret);
  4. ramfs_write(vnode_t *file, off_t offset, const void *buf, size_t count)

    1
    2
    3
    4
    5
    - transfers count bytes from buf into file.
    - 调用VNODE_TO_RAMFSINODE(),获得vnode对应的inode
    - 确保inode不是directory
    - 将buf中的内容复制到inode中的inode->rf_mem
    memcpy(inode->rf_mem + offset, buf, ret);
  5. ramfs_readdir(vnode_t *dir, off_t offset, struct dirent *d)

    1
    2
    3
    4
    5
    - 在当前dir中,从offset处,“挨个”读取dir中的entry到数据结构d中;成功读取某个entry后,返回值是下一次调用该函数时应该起始的offset(相当于加了刚刚读取entry/inode的file_size)
    - reads one directory entry from the dir into the struct dirent. On success, it returns the amount that offset should be increased by to obtain the next directory entry with a subsequent call to readdir.
    - 确保inode是directory
    - 将buf中的内容复制到inode中的inode->rf_mem
    memcpy(inode->rf_mem + offset, buf, ret);
  6. ramfs_stat(vnode_t *file, struct stat *buf)

    1
    2
    - sets the fields in the given buf, filling it with information about file
    - 在 stat 中填入各种统计信息

FS - File System: Name Resolution

Posted on 2018-04-01 | In Courses | Comments:

lookup()

1
2
int lookup(vnode_t *dir,  char *name, 
size_t len, vnode_t **result)

1. 使 vnode “活”起来

lookup()、vget()、ramfs_read_vnode() 一起使 vnode “活起来,成为完整 vnode”

2. lookup 流程:

在给定的 dir_vnode 下,查找是否存在名字是”name”的 vnode

  • 先调用 ramfs_lookup( ) 查找 dir_vnode 下是否有相应 entry
  • 后根据 entry.ino,调用vget(fs,ino) 查找该 inode_num对应的 inode
    1. if exist, 更新 refcount, 直接返回 vnode
    2. if none, 创建 new vnode,填充部分信息;传给ramfs_read_vnode()
  • 调用 ramfs_read_vnode( ) 获得完整vnode

3. name resolution: 虚实连接、递归查找

  • lookup() 会调用 ramfs_lookup (a specific FS),由AFS代为查找
  • 递归进行name resolution:查找到相应的inode之后,继续以得到的inode查找下一个那么,

dir_namev()

1
2
3
int dir_namev(const char *pathname, size_t *namelen, 
const char **name, vnode_t *base,
vnode_t **res_vnode)

1. man dirname

it deletes the filename portion, beginning with the last slash ‘/‘ character to the end of string (after first stripping trailing slashes), and writes the result to the standard output.

  • 提取 pathname 的 parent directory inode;
  • 同时保存最后一级 directory/file 的 name

2. 三个例子:

1
2
3
4
5
6
7
8
9
10
11
1. 正常情况
$ dirname /Users/kevin/Desktop/html-DOM.jpg
/Users/kevin/Desktop

2. 即便文件名字后边有 “/”,会先将“/”去掉
$ dirname /Users/kevin/Desktop/html-DOM.jpg/
/Users/kevin/Desktop

3. 不但对文件(file)适用,对目录(directory)也适用
$ dirname /Users/kevin/Desktop/
/Users/kevin

3. refcount

  • 该函数如果成功返回的话,会使 res_vnode,也就是parent directory inode的 refcount++

  • 因为函数内部会逐级调用 lookup() 进行 AFS call 以及 vput(base) 来抵消lookup(base),给每级base带来的refcount++

  • 但是lookup()找到了parent directory inode 的时候,刻意不调用vput(base),是最后一级(即res_vnode)的refcount加“1”
  • 这是有原因的:用户调用dir_namev(),就是要对这个dir就行操作的,需要停留在这里,因此需要对硬盘中相应的对象做相应的refcount更新

4. dir_name() 流程

1
2
3
int dir_namev(const char *pathname, size_t *namelen, 
const char **name, vnode_t *base,
vnode_t **res_vnode)
  1. 根据 base 的值确定查找的起始节点
    • base == NULL, base = curproc -> p_cwd;
    • 如果 pathname 以 “/“ 开始,忽略 base 的值;base = vfs_root_vn;
  2. 更新 base 的refcount => vref(base);
  3. 依次提取 pathname 中 name 部分,在当前 base inode 下查找是否存在对应 entry
    • 维护一个 start_ptr:指向”/“之后第一个位置
    • 维护一个 end_ptr: 指向下个”/“之前第一个位置
    • [start, end] 之间就是 name 部分
  4. 调用 lookup 查找该 base vnode之下,是否有 name 的 vnode
    • 返回值 != 0, 失败,提前return
    • 返回值 == 0, 成功,递归查询下一级 name
    • 更新本次查询使用的 base 的refcount
  5. 递归查询:将此次得到的 vnode 设置为下一次查询的 base
  6. 直到start_ptr >= len,表明路径解析完成,跳出
    • 注意:在循环中的 lookup() 之前跳出
    • 因为这是查找上级 dir inode,并非查找最后一级inode
  7. 检查最后得到的 inode 是否为 directory
  8. 填充相应的返回值;返回 0(成功)

open_namev()

1
2
3
4
5
6
7
8
9
int open_namev(const char *pathname, int flag, 
vnode_t **res_vnode, vnode_t *base)

- 输入:
+ pathname:指定要打开的绝对路径
+ flag=O_CREAT && name 不存在,那么创建新的
+ base:指定从那个vnode 目录下开始解析路径

- 输出:将打开的 vnode 存在 res_vnode 中

1. man open

opens a file, a directory or even an URL, just as if you had double-clicked the file’s icon

  • 打开一个文件/目录/URL,相当于 Linux 的 open 指令
  • open_namev = dir_namev + lookup + (create)

2. open_namev 流程

  1. 调用 dir_namev() 解析 pathname
    • retcode = dir_namev(pathname, &namelen, &name, base, &dir);
    • 输入参数的错误处理由 dir_namev() 解决了
    • 检查返回值,如果没错误,更新 refcount
    • 继续下一步
  2. 根据刚得到的dir,调用 lookup() 打开dir下的该vnode
    • retVal = lookup(*dir,name,len,res_vnode);
    • 如果存在的话:将 vnode 返回到 res_vnode 中
    • 如果不存在的话,同时又满足(flag & O_CREAT) == O_CREAT,那就创建新的vnode
      • 调用(*dir)->vn_ops->create(*dir,name,len,res_vnode);
    • return retval

FS - VFS system call

Posted on 2018-04-01 | In Courses | Comments:

VFS system call

  1. Interfaces for specific File Systems, like ramfs, s5fs.
  2. 在Linux中,文件名字没有缀;“file”与“directory”无区别
  3. 所有涉及“绝对路径”最后一级拆分的,会先将trailing “/” 去掉
  4. lookup()这个函数作用巨大:
    • 在dir_inode中,找名字是“name”的entry,并把该entry变为vnode放到result中
    • ramfs_lookup => entry => vget(entry) => ramfs_read_vnode(vnode) => 完整vnode
    • VFS-AFS-VFS: “虚、实连接的小能手”
    • 递归进行name resolution
      • 问 parent inode:你是否包含名字为“name”的entry?
      • if Yes,把该entry以 child inode的形式返回
      • 递归进行lookup,直至找到目标name的inode
  5. 以vn_mode来区别inode的类型**

    1
    2
    3
    4
    5
    S_IFDIR  directory   
    S_IFREG regular
    S_IFLNK symlink
    S_IFCHR character special
    S_IFBLK block special
  6. 为什么 dir_namev() 与 lookup() 一起使用?直接使用open_namev()可以么??

1. open

1
2
3
4
5
6
7
8
9
10
11
12
13
14
15
16
17
18
19
20
21
22
23
24
25
26
27
28
29
30
31
32
33
34
35
36
37
38
39
40
41
42
43
44
45
46
47
48
49
int do_open(const char *filename, int oflags)

输入:
user process 传入的 filename
user process 传入的 oflags: READ | WRITE | APPEND
输出: fd( 可以是 file/directory )

0. 设置 f_mode 有点麻烦:
- f_mode 由传入的 oflags 的位信息组合而成三种结果:
+ FMODE_READ 1
+ FMODE_WRITE 2
+ FMODE_APPEND 4
- oflags 有以下必须有以下前三者中一个;
额外有creat bit、以及status bit
(只需考虑O_CREAT,O_TRUNC跟随O_CREAT):
+ O_RDONLY 0
+ O_WRONLY 1
+ O_RDWR 2
+ O_CREAT 0x100 /* Create if non-exist */
+ O_TRUNC 0x200 /* Truncate to 0-length */
+ O_APPEND 0x400 /* Append to file. */
- 注意:O_CREAT 不必写到 f_mode 中去;这里的O_CREAT是
告知 kernel:如没有此文件,帮我创建一个;而新建
是由 open_namev() 根据 oflags=O_CREAT 执行的
- 设置 f_mode 流程:
+ 首先,通过“与运算&”,取得oflags 低位的位信息;
+ 若不是 RD/WR/RDWR中的任一个,返回-EINVAL
+ 若合法,则使用 if-else 将后三位确定;
+ 然后,获得高位的位信息,取得creat/status bit
+ 若是 O_APPEND,当前f_mode“或运算|”上O_APPEND位
+ 不必考虑是否为 O_CREAT,open_namev()会检查
+ 如果不是其中任何一个,高位置 “0”
+ 使用 if-else 设置高位信息
1. 获得可用的 fd
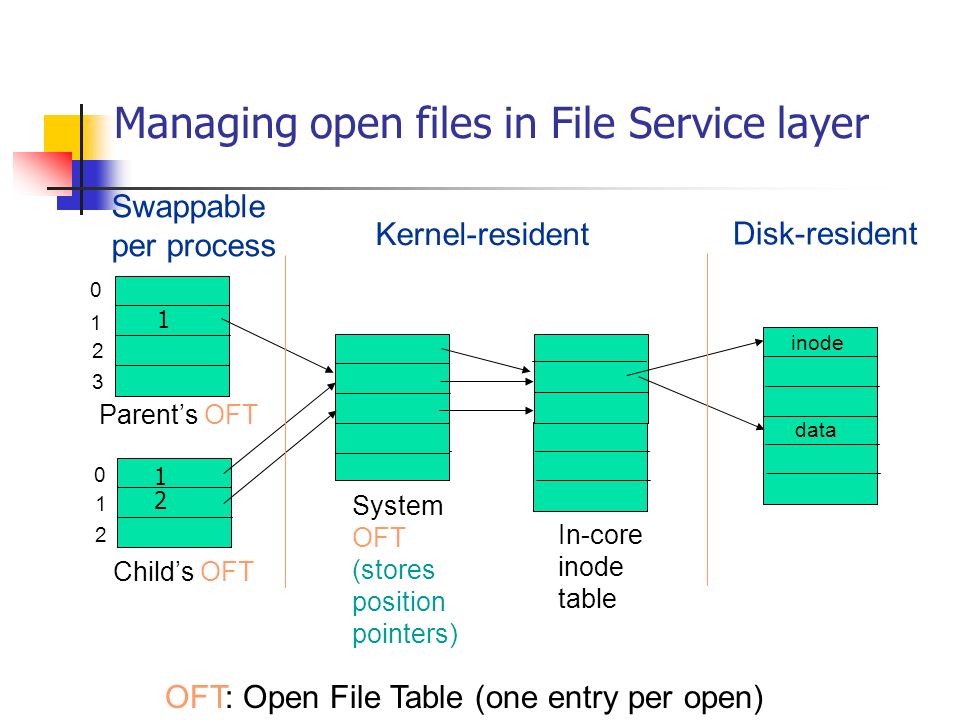
2. 获得新的 open_file_conn(kernel全局唯一的open file table)
3. 更新 curproc->p_file[fd] = open_file_conn
4. 检查 file mode, based on oflags
5. 调用 open_namev(filename, oflags, &vno, NULL)
- open_namev()调用 path_namev()
- open_namev()调用 lookup() 通用接口
- lookup() 通用接口调用 specific FS ramfs_lookup()
- specific FS ramfs_lookup() 在当前 vnode 下,查找名字是“name”的 vnode,将结果存到result中
- specific FS ramfs_lookup()找到了该“name”的entry,根据"name:vnode_num" pair,再次调用 vget(vnode_num)
- vget中会调用ramfs_read_vnode(vnode_t *vn)该vnode的加载完成
- vget( ) 内部创建一个“半成品”vnode,传入 ramfs_read_vnode( )
- ramfs_read_vnode( ) 根据具体的file system将该vnode中的所有成员函数、成员变量补充完成
6. 至此,open_namev() 得到的vnode是“活的”、完整的
7. 最后,do_open中将open_conn的vnode指针指向刚刚创建的vnode
f->f_vnode = vnode;

2. read

1
2
3
4
5
6
7
8
9
10
11
12
13
14
15
16
17
18
19
20
int do_read(int fd, void *buf, size_t nbytes)

输入:
user process 传入的 fd
user process 传入的 buf,用以接受从 file 读取的内容
user process 传入的 nbytes,指明需要读的字节数
输出: 实际读入字节数、or 错误信息

0. 检查传入参数是否正确
1. 调用 fget(fd) 获得由OS维护的全局唯一的open_conn_table中对应的 file_conn
- fget()会自动对该file_conn执行refcount++
2. 检查获得的file_conn,是否valid
- 检查该file是否“可读”:return -EBADF;
- 检查该file是否是“dir”,而非“data”:return -EISDIR;
3. 通过 file_conn->f_vnode,获得 vnode_table中的 vnode entry,
4. 调用获得的vnode的 vn_ops(函数指针) 中的对应的 read()
- 虽然这里的 read() 为抽象的接口,
- 但是在do_open()的时候specific FS 的read()已实现了该接口
5. 读操作完成后,需要移动 open_conn中的f_pos指针
6. 最后,调用fput(),更新 f_refcount;返回读操作的字节数

3. write

1
2
3
4
5
6
7
8
9
10
11
12
13
14
15
16
17
18
19
20
21
int do_write(int fd, const void *buf, size_t nbytes)

输入:
user process 传入的 fd
user process 传入的 buf,用从buf向 file 写数据
user process 传入的 nbytes,指明需要写的字节数
输出: 实际写字节数、or 错误信息

0. 检查传入参数是否正确
1. 调用 fget(fd) 获得由OS维护的全局唯一的open_conn_table中对应的 file_conn
- fget()会自动对该file_conn执行refcount++
2. 检查获得的file_conn,是否valid
- 检查该file是否“可写”:return -EBADF;
- 检查该file是否是“dir”,而非“data”:return -EISDIR;
- 同时应该检查是否为APPEND模式,需要调用do_lseek()重置cursor
3. 通过 file_conn->f_vnode,获得 vnode_table中的 vnode entry
4. 调用获得的vnode的 vn_ops(函数指针) 中的对应的 write()
- 虽然这里的 read() 为抽象的接口,
- 但是在do_open()的时候specific FS 的read()已实现了该接口
5. 写操作完成后,需要移动 open_conn中的f_pos指针
6. 最后,调用fput(),更新 f_refcount; 返回写操作的字节数

4. close

1
2
3
4
5
6
7
8
9
10
11

输入:user process 传入的 fd
输出: 0-成功;(-EBADF)-失败

1. 检查传入参数正确性
2. 更新 fd 对应的 open_conn 的信息
- fput( curproc->p_files[fd] )
+ f->f_refcount--;
+ if(f->f_refcount==0) vput(curproc->p_files[fd]->f_vnode)
3. 将该process的fd table中该fd 置为 NULL
4. 返回 0 :成功

5. duplicate a file_descriptor

1
2
3
4
5
6
7
8
9
10
11
12
13
int do_dup(int fd)

输入:user process 传入的 fd
输出: fd OR (-EBADF)-失败

1. 检查传入参数正确性
2. 获得该 fd 对应的 open_conn
- file_t *file = fget(fd);
3. 获得下一个可用的 fd
- availFd = get_empty_fd(curproc);
4. 更新该 process 的 fd table 中 fd 对应的 open_conn
- curproc->p_files[availFd] = file;
5. 返回 availFd

6. duplicate with a designated file_descriptor

1
2
3
4
5
6
7
8
9
10
11
12
13
14
15
16
int do_dup2(int ofd, int nfd)

输入:user process 传入的 fd
输出: nfd OR (-EBADF)-失败

1. 检查传入参数正确性
2. 获得该 fd 对应的 open_conn
- file_t *file = fget(fd);
3. 检查 nfd
- 如果 ofd==nfd, 需要fput(file),因为之前fget()了,
导致open_conn的refcount增加了;这里是同一个fd,要再变回去
- 如果 nfd 在使用中:curproc->p_files[nfd] != NULL
那么需要先将nfd原来对应的 open_conn 关了
+ do_close(nfd);
4. curproc->p_files[nfd] = file;
5. 返回 nfd

7. mknode

1
2
3
4
5
6
7
8
9
10
11
12
13
14
15
16
17
18
19
20
21
22
int do_mknod(const char *path, int mode, unsigned devid)

输入:path(node的绝对路径) | mode(S_IFCHR/S_IFBLK) | devid(device identifier 对应该 node)
输出: 0:成功 负数:失败

1. 检查输入参数的正确性
- 检查mode,必须只能在 S_IFCHR/S_IFBLK 两者之中取值
- 检查path,不能超过 path_name 的最大长度
2. 获得该path对应的vnode,通过调用 dir_namev()
- retval = dir_namev(path,&nameLen,&name,NULL,&dir);
- 该dir路径不是我们想要驻足操作的地方,只是“瞟一眼”
+ vput(dir):因为dir_namev()会将dir的refcount++
- 检查该 path 是否合法;不合法的话提前return
3. 检查最后一级目录(dir)下是否已经有名字为name的目录
- value_lookup = lookup(dir,name,nameLen,&result);
4. 如果有的话,value_lookup==0,表明最后一级路径不合法
- vput(result):因为lookup()会讲result的refcount++
5. 如果没有的话:value_lookup==-ENOENT,这是我们期望的情况:
- 在当前result directory下调用 specific FS 的 mknod()创建相应node;
- 返回
6. 【注意】熊的版本
- vput() 不必写那么麻烦,写在最外层即可

8. make directory

1
2
3
4
5
6
7
8
9
10
int do_mkdir(const char *path)

输入:user process 传入的path(创建的node放在哪)
输出: specific FS的返回值

1. Use dir_namev() to find the vnode of the dir we want to make the new directory in.

2. Then use lookup() to make sure it doesn't already exist.

3. Finally call the dir's mkdir vn_ops. Return what it returns.

9. remove directory

1
2
3
4
5
6
7
8
9
10
11
12
13
14
15
16
17
int do_rmdir(const char *path)

输入:user process 传入的path(最后一级是要将被删除的)
输出:specific FS的返回值

0. 删除 directory ( 下一条就是 删除 file )
- 删除dir的操作是: target dir 的 parent dir 根据 target dir's name 执行删除操作
- 不需考虑 target dir是否存在,parent dir的rmdir会handle(如下边的do_unlink()不一样)
1. 调用 dir_namev() 获得path最后一级vnode的parent directory
- Use dir_namev() to find the vnode of the directory containing the dir to be removed.
2. 检查 dir_namev()的返回值,根据情况处理Error
3. 根据返回的vnode,调用specific FS 的rmdir()
- call the containing dir's rmdir() v_op
- 注意 name 不能是 "." or ".."
- 调用 value_remove = dir->vn_ops->rmdir(dir, name, namelen);
4. 最后 处理 dir的 refcount
- vput(dir);

10. unlink

1
2
3
4
5
6
7
8
9
10
11
12
13
14
15
16
17
18
int do_unlink(const char *path)

输入:user process 传入的path(最后的file是要将被删除的)
输出:specific FS的返回值

0. 删除 file ( 上一条就是 删除 directory )
- 删除file的操作是: target dir 的 parent dir 根据 target file's name 执行删除操作
- 需要考虑 target file是否存在,在调用parent dir的unlink()(如下边的do_rmdir()不一样)
1. 调用 dir = dir_namev() 获得目标 file 的dir;
- 如果有错误,提前返回
- 没有错误,vput(dir);
2. 调用 lookup(dir,name,&result)检查 目标file是否存在于该dir下
- 不存在的话,提前返回
- 如果该file是一个directory的话,vput(file),提前返回
3. 根据返回的dir vnode,调用specific FS 的unlink()
- call the containing dir's unlink() v_op
4. 最后 处理 dir的 refcount
- vput(result);

11. link

1
2
3
4
5
6
7
8
9
10
11
12
13
14
15
16
17
18
19
20
21
int do_link(const char *from, const char *to)

【注意1】这里的link是hard link,就是源文件如果删除了,
那么被hard link的file不会一同消失,复制的文件靠hard link
(即vnode中也存了一个指向硬盘中对应data block的inode的指针)
与硬盘中的inode建立了联系
【注意2】hard link的源文件只能是 file,不能是dir
输入:源文件绝对路径from、目标路径to
输出:0:成功; 负数:失败

1. 调用open_namev(from),获得源文件file的 vnode
- 检查源文件的 vnode,确保是file,不是dir
2. 调用dir_namev(to),获得目标路径dir,以及银的文件名name
- value_tolink = dir_namev(to, &namelen, &name, NULL, &to_dir)

3. 调用 lookup(),检查目标dir下,是否已经存在 名字是name的inode
- 如果已经存在,提前返回
- 如果不存在,执行下一步
4. 调用 specific FS 的 link() 操作
- to_dir -> vn_ops -> link(from_vnode, to_dir, name, namelen)
5. 注意 from_vnode、to_dir 的refcount值

12. rename

1
2
3
4
5
6
7
8
9
10
11
int do_rename(const char *oldname, const char *newname)

【注意】这里不是改名字!!而是修改“硬盘文件”在file system中的绝对路径

输入:旧文件绝对路径oldname、旧文件绝对路径newname
输出:unlink()的返回值

1. 调用 do_link(),对旧文件建立一个hardlink到新文件
- 检查hardlink是否创建成功
2. 调用 do_unlink(),将旧文件删除
3. 返回 do_unlink() 的返回值

13. change dir

1
2
3
4
5
6
7
8
9
10
11
12
13
14
15
int do_chdir(const char *path)

输入:当前process的新cwd的绝对路径
输出: 0:成功 负值:失败

【注意】改变current working directory,
实际上是改变 process中vnode的指针

1. 调用open_namev()获得新cwd的vnode
- 检查返回值是否valid
- 检查该vnode,确保其实dir,非file
2. 更新之前的cwd的refcount
- vput(curproc->p_cwd);
3. 更新process 的cwd
- curproc->p_cwd = vno;

14. get dir entry

1
2
3
4
5
6
7
8
9
10
11
12
13
14
15
16
17
18
19
20
21
22
23
24
25
26
27
int do_getdent(int fd, struct dirent *dirp)

- 操作目录:给定文件,依次读取目录到 dirp 中
- 与之前的 read、write直接对文件操作不同,这是对“directory entry”的操作
- 使用场景:搜索第8个目标子目录,对该目录依次调用8次该函数

输入:fd、dirp(下面的三个信息作为成员变量存在dirp中)
输出:returns the amount that offset should be increased by to obtain the next directory entry with a subsequent call to readdir
【注意0】每个FS的 dir_inode 实际上维护着一个entry array,
但是总数有上限:RAMFS_MAX_DIRENT;
因此只要一直调用do_getdent(),有可能读到 NULL值
即:“没有entry了怎么办?管他呢!一直读。。。”
[====Oh my god!不是很确定。。。]

【注意1】从fd所代表的directory依次读取它里边的entry;
开始时从头读取entry,信息放到dirp结构体中;
之后entry的读取起始位置offset,
会由上一次该函数的调用自动更新f_pos += ent_size;,
从而实现顺序读取entry的目的
【注意2】这个函数比较叼~
- 读取到fd对应的inode下的entry的 name( 不论 file/dir )
- 读取到了这个file在硬盘中对应的 entry inode number
- 读取到该目录下一个 entry的起始offset

1. 调用fget()获得 open_conn
2. 由open_conn进而获得 vnode
3. 由vnode进而调用 specific FB的 readdir(),获得第一个 entry,存到dirp

15. lseek

1
2
3
4
5
6
7
8
9
10
11
12
13
14
15
int do_lseek(int fd, int offset, int whence)

输入:fd、偏移量offset、从哪里计算偏移whence
输出: 0:成功

1. 调用 fget() 获得 open_conn
2. 直接对相应的 open_conn进行操作,不需要往下深入到vnode
3. 根据 whence 情况,设定 new_cursor
- whence==SEEK_SET, new_pos = offset;
- whence==SEEK_CUR,new_pos = file->f_pos + offset;
- whence==SEEK_END,new_pos = file->f_vnode->vn_len + offset;
- else,出错了。fput()
4. 更新open_conn的f_pos、以及refcount
- file->f_pos = new_pos;
- fput(file);

16. statistic

1
2
3
4
5
6
7
8
9
10
11
12
int do_stat(const char *path, struct stat *buf)

输入:需要统计的绝对路径path、用于存储统计信息的stat
输出:specific FS 的stat()返回值

1. 调用open_namev(),获得该path的vnode
- open_namev(path, 0,&res_vnode,NULL);
- 检查返回值
2. 由拿到的 vnode,调用specific FS的stat()
- res_vnode->vn_ops->stat(res_vnode, buf);
3. 更新res_vnode的refcount
- vput(res_vnode);

Tasks assignment: Kernel Virtual File System

Posted on 2018-03-30 | In Courses | Comments:

Knowledge frame

Useful Link 1 on Workflowy

Useful Link 2 on USNA

Tasks allocation

1. vnode.c

A: special_file_read()
A: special_file_write()

2. name.c

A: lookup()
A: dir_namev()
A: open_namev()

3. open.c

A: do_open()

4. vfs_syscall.c

A: do_close()

B: do_read()
B: do_write()
B: do_dup()
B: do_dup2()

C: do_mknod()
C: do_mkdir()
C: do_rmdir()
C: do_unlink()
C: do_link()

D: do_rename()
D: do_chdir()
D: do_getdent()
D: do_lseek()
D: do_stat()

5. main.c

idleproc_run() :2 

6. proc.c

proc_create()

Tiny URL

Posted on 2018-03-28 | In Portfolios | Comments:

I. Introduction

A MEAN stack Single Page Application, providing:

  1. URL shortening service
  2. Traffic statistics collecting service

Tech stacks: AngularJS, Node.js, Express, MongoDB, Redis, Nginx, Docker

Github: https://github.com/caomingkai/URL-shortening-service


II. Work flow

1. Users come to the app webpage

  • Browser send GET request with original URL to server
  • Server sends index.html to clients
  • Browser get the index.html with script in the head tag.
    <script src='angularJS library '> <script src='app.js'> <script src='/public/js/controllers/homeController.js'>
  • Browser again sends request for angularJS library/ js controller files to different servers
  • when browser encounter ‘ng-view’, it automatically turn to ‘ng-router’, ask for its view and controller; Again, sends corresponding GET request to fetch sub-view files
  • while browser parse the controller js file, it might do AJAX request to fetch information from server.

2. Users use the shortening service

  • Input longURL in the input box, and click ‘submit’
  • ‘submit’ fires the onclick funcion to do 2 things:
    • send the longURL to specified URL, ie. POST to localhost/api/v1/urls
      NOTICE: This url is specifically used for rendering short/long URL
    • send the longURL to specified URL, ie. POST to localhost/api/v1/urls
      NOTICE: this step is executed after app server responds the POST request in the first step with the calculated shortURL
  • App server first receive the POST request with longURL, do 2 things: call the urlService to calculate the shortURL, store long/short URL pair in MongoDB;send back the shortURL to the app webpage.
    NOTICE: the shortURL should consist different prefix compared with the current app URL. Because it is create for outside users. So the shortURL should not prefix with /api/v1/.., but with just '/:shortUrl'
  • After the app webpage getting shortURL, it renders new subview using url.html; Meanwhile, it needs to know the its original longURL for display.
  • Again, in the url.html subview, it sends GET request to the app server to get the longURL
    Notice: This step could be simplified by just passing the longURL from the first subview to the second subview creating a service or using the $rootScop
  • Now, in the new subview, the longURL and shortURL pair can be displayed

3. Visitors browse the shortURL

  • the shortURL is just clicked from various browsers/ machines/ from different IP/ countries, at different time
  • when shortURL is clicked, it sends GET request ‘localhost/:shortUrl’ to the app server.
  • the app sever call the urlService to get the longURL from the shortURL, and redirect users to the original long URL

4. Traffic statistics Info

  • We want to record the total number of clicks / their browsers/ machine brands/ their IP/ countries/ timestamp. And display them in the app webpage.
  • So first we need add more elements in the url.html subview in the frontend; And update those information in the backend.
    • updating the info each time the shortURL is clicked. And then store them in the MongoDB
    • when app webpage is clicked, make AJAX call to the app server, let it get the info from MongoDB, and then send back to frontend
  • Since all these clicks directly send GET request to ‘localhost/:shortURL’, which is handled by redirect.js. Thus, we here need a statistic service to update these info.
  • Here we need the one of Express modules: Express-useragent to extract the information from the request
  • In the statistic service, we use the express-useragent to get the info, and then store them in the MongoDB database with a new schema.

III. Nginx

Reverse Proxy

  • (正向)代理forward proxy: 在client与internet之间,替client访问internet的计算机
    • 路由器就是一个forward proxy,外网看不到路由器之后的计算机,但是计算机可以看到外边
    • 翻墙服务器
  • (反向)代理:在server与internet之间,替server接受internet访问的计算机

Features

  • Hide Original server
    “安全”
  • application firewall
  • SSL termination: “加密不需要server进行,反向代理可以代为计算以减轻server压力”
  • Load balance
    1. round robin
      “optionally weighted”
    2. least connected
      “optionally weighted”
    3. IP hash
      “1~200: server a; 201~400: server b”
    4. Generic Hash
      “based on devices/ client locations”
    5. Least time (nginx plux)
      “optionally weighted”
  • Cache
    • GET 都可以cache
    • 即便是动态列表也进行cache,因为实际生活的改变不会比nginx的处理快 “1s <---> 100000 request/s”
    • POST不能cache
  • Compression(gzip)
    “减小网络传输量: 用reverse proxy/ browser 的CPU为代价”
  • 不宕机进行配置改变/升级

News Recommendation using Wed Mining

Posted on 2018-03-27 | In Portfolios | Comments:

I. Introduction

An internet-based news aggregator, providing hot news scraping on popular news sources, with recommendation feature based on users’ preference with the help of Machine Learning.

#Github: https://github.com/caomingkai/News_Recommendation_System

Pull it and run it with Shell script!

  • Firstly, run ./launcher.sh:
    • run redis
    • run mongoDB locally
    • start recommendation service(python)
    • start backend service(phython)
    • start web-server service(Node.js + ReactJS)
  • Secondly, run ./news_pipeline_launcher.sh:
    • run redis
    • run mongoDB locally
    • install python requirements
    • start news_topic_modeling_service (python Machine Learning)
    • start news collecting service(data pipeline + web scraping)

II. Tech stack:

  • Front end: React, Express, Node.js, OAuth
    • Built a responsive single-page web application for users to browse news (React, Node.js, RPC, SOA, JWT)
  • Back end: Python RPC, MongoDB, Redis, RabbitMQ
    • Service Oriented, multiple backends serving via JSON RPC
    • Implemented a data pipeline which monitors, scrapes and deduplicates news
  • News recommendation system: Tensorflow, DNN, NLP
    • Designed and built an offline training pipeline for news topic modeling
    • Deployed an online classifying service for news topic modeling using trained model
  • News topic classifying system: TF-IDF, NLP, RabbitMQ
    • Implemented a click event log processor which collects users’ click logs, updated a news model for each user

Chart1: Login Page with Authentication

Chart2: News feed page

III. System structure:

  1. Front end tier: React & Node.js
  2. Back end tier: providing RPC API for communication among different tiers
  3. News recommendation system: time decay algorithm
  4. News topic classifying system: Tensorflow with 2-layer CNN model for classification
  5. data pipeline: get news sources
    • News monitor: gets news from News.API
    • News scraper: web scraper
    • News deduper: news TF-IDF deduplication

Chart 3: System with Machine Learning module
chart

Chart 4: System with Recommendation module
chart

Chart 5: Service dependency
chart

Facebook Custom Search

Posted on 2018-03-27 | In Portfolios | Comments:

I. Introduction

An application for both web-version and IOS-version, supported by PHP-based server on AWS EC2, allows searching, displaying and posting information on Facebook.

Tech stacks: AngularJS, Bootstrp, PHP, AWS EC2, Swift, Cocoa

Github web: https://github.com/caomingkai/FaceBook-custom-Search-Web-App

Github IOS: https://github.com/caomingkai/FaceBook-custom-Search-Web-App


eCommerce Website Design

Posted on 2018-03-27 | In Portfolios | Comments:

Introduction

Designed and developed an eCommerce website for a milk tea house, including ‘Menu’, ‘Contact’, ‘Career’ sections.

Tech stacks: Shopify Liquid, HTML, Bootstrap, JavaScript

password: ttotea


Binary Search variations

Posted on 2018-03-27 | In Algorithm | Comments:

Credit to : http://izualzhy.cn/algorithm/2014/04/18/binary-search-analysis

I. 二分法及变种的注意点:

1. 如何得到循环不变式

【定义】就是在每次循环里,我们都可以保证要找的index在我们新构造 的区间里。
【例子】如正常二分法,循环不变式表述如下:

if array[mid] > key:
    right = mid - 1
 else if array[mid] < key:
     left = mid + 1
 else
     return mid

考虑中间值与key的关系:

  • 如果中间值比key大,那么[mid, right]的值我们都可以忽略掉了,这些值都比key要大。只要在[left, mid-1]里查找就是了。
  • 如果中间值比key小,那么[left, mid]的值可以 忽略掉,这些值都比key要小,只要在[mid+1, right]里查找就可以了。
  • 如果相等,表示找到了,可以直接返回。如果最后这个区间没有,那么就确实是没有 。所以说循环不变式,就是在每次循环里,我们都可以保证要找的index在我们新构造的区间里

2. 数组是非递增还是非递减

3. 结束条件,即while (condition) 应当是<还是<=

“< ” 表明可选区间长度 2~n ;  OR    
“<= ” 表明可选区间长度 1~n 

4. 求mid应当是向上取整还是向下取整

mid = (left + right) >>1       OR
mid = (left + right + 1) >>1

5. while 结束后是否需要判断一次条件

对应可选区间为2~n情况,将所有元素check完毕;  
同时,调整mid取整方式,使该判断优雅

II. 常见问题:

1. 查找值key的下标,如果不存在返回-1.

1
2
3
4
5
6
7
8
9
10
11
12
13
14
15
16
int BS(const Vec Int& vec, int key)
{
int left = 0, right = vec.size() - 1;
while (left <= right)
{
int mid = (left + right) >> 1;
if (vec[mid] > key)
right = mid - 1;
else if (vec[mid] < key)
left = mid + 1;
else
return mid;
}

return -1;
}
  • 如果中间值比key大,那么[mid, right]的值我们都可以忽略掉了,这些值都比key要大。只要在[left, mid-1]里查找就是了。
  • 如果中间值比key小,那么[left, mid]的值可以 忽略掉,这些值都比key要小,只要在[mid+1, right]里查找就可以了。
  • 如果相等,表示找到了, 可以直接返回。

因此,循环不变式就是在每次循环里,我们都可以保证要找的index在我们新构造 的区间里。如果最后这个区间没有,那么就确实是没有。
注意mid的求法,可能会int越界,但我们先不用考虑这个问题,要记住的是这点:mid是偏向left的,即如果left=1,right=2,则mid=1。

2. 查找值key第一次出现的下标x,如果不存在返回-1.

1
2
3
4
5
6
7
8
9
10
11
12
13
14
15
16
17
int BS_First(const VecInt& vec, int key)
{
int left = 0, right = vec.size() - 1;
while (left < right) //问题1,left < right时继续,相等就break.
{
int mid = (left + right) >> 1;
if (vec[mid] < key)
left = mid + 1;
else
right = mid;
}

if (vec[left] == key) //问题2,再判断一次。
return left;

return -1;
}

我们仍然考虑中间值与key的关系:

  • 如果array[mid]<key,那么x一定在[mid+1, right]区间里。
  • 如果array[mid]>key,那么x一定在[left, mid-1]区间里。
  • 如果array[mid]≤key,那么不能推断任何关系。比如对key=1,数组{0,1,1,2,3},{0,0,0,1,2},array[mid] = array[2] ≤ 1,但一个在左半区间,一个在右半区间。
  • 如果array[mid]≥key,那么x一定在[left, mid]区间里。
  • 综合上面的结果,我们可以采用1,4即<和≥的组合判断来实现我们的循环不变式,即循环过程中一直满足key在我们的区间里。

注意问题:

  • 循环能否退出,我们注意到4的区间改变里是令right = mid,如果left=right=mid时,循环是无法退出的。换句话说,第一个问题我们始终在减小着区间,而在这个问题里,某种情况下区间是不会减小的! —– 见代码
  • 循环退出后的判断问题,再看下我们的条件1,4组合,只是使得我们最后的区间满足了≥key,是否=key,还需要再判断一次。 —– 见代码

3. 查找值key最后一次出现的下标x,如果不存在返回-1.

1
2
3
4
5
6
7
8
9
10
11
12
13
14
15
16
17
int BS_Last(const VecInt& vec, int key)
{
int left = 0, right = vec.size() - 1;
while (left < right)
{
int mid = (left + right + 1) >> 1;
if (vec[mid] > key)
right = mid - 1;
else
left = mid;
}

if (vec[left] == key)
return left;

return -1;
}

循环不变式(省去分析的过程,同上):

  • 如果array[mid]>key,那么x一定在[left, mid-1]区间里。
  • 如果array[mid]≤key, 那么x一定在[mid, right]区间里。

注意问题:

  • 在条件2里,实际上我们是令left=mid,但是如前面提到的,如果left=1,right=2,那么mid=left=1,同时又进入到条件2,left=mid=1,即使我们在while设定了left < right仍然无法退出循环,
  • 解决的办法很简单:mid = (left + right + 1) >> 1, 向上取整就可以了。

4. 查找刚好小于key的元素下标x,如果不存在返回-1.

1
2
3
4
5
6
7
8
9
10
11
12
13
14
15
16
17
int BS_Last_Less(const VecInt& vec, int key)
{
int left = 0, right = vec.size() - 1;
while (left < right)
{
int mid = (left + right + 1) >> 1;
if (vec[mid] < key)
left = mid;
else
right = mid - 1;
}

if (vec[left] < key)
return left;

return -1;
}

循环不变式(省去分析的过程,同上):

  • 如果array[mid]<key,那么x在区间[mid, right]
  • 如果array[mid]≥key,那么x在区间[left, mid-1]

5. 查找刚好大于key的元素下标x,如果不存在返回-1,等价于std::upper_bound.

1
2
3
4
5
6
7
8
9
10
11
12
13
14
15
16
17
int BS_First_Greater(const VecInt& vec, int key)
{
int left = 0, right = vec.size() - 1;
while (left < right)
{
int mid = (left + right) >> 1;
if (vec[mid] > key)
right = mid;
else
left = mid + 1;
}

if (vec[left] > key)
return left;

return -1;
}

循环不变式(省去分析的过程,同上):

  • 如果array[mid]>key,那么x在区间[left, mid]
  • 如果array[mid]≤key,那么x在区间[mid + 1, right]

6. 查找第一个>=key的下标,如果不存在返回-1,等价于std::lower_bound.

1
2
3
4
5
6
7
8
9
10
11
12
13
14
15
16
17
18

int BS_First_Greater_Or_Equal(const VecInt& vec, int key)
{
int left = 0, right = vec.size() - 1;
while (left < right)
{
int mid = (left + right) >> 1;
if (vec[mid] < key)
left = mid +1;
else
right = mid;
}

if (vec[left] >= key)
return left;

return -1;
}

循环不变式(省去分析的过程,同上):

  • 如果array[mid]<key,那么x在区间[mid + 1, right]
  • 如果array[mid]≥key,那么x在区间[left, mid]

1…789
Mingkai Cao

Mingkai Cao

All-trade Jack, loves full-stack

85 posts
5 categories
136 tags
GitHub E-Mail
© 2020 Mingkai Cao
Powered by Hexo
|
Theme — NexT.Mist v6.0.6